
After launching my portfolio with Next.js on Vercel, I set up Strapi on Render to power my blog content. Now I can easily write and manage posts, and share them with the world through my site.

Steven Sean
Software Engineer · Updated on April 7, 2025
Expanding my portfolio project with blog posts is a fun step forward. It adds a personal touch and gives me a space to share what I’ve been learning and building.
Writing directly in a live Strapi app—without needing to run it locally—makes the whole process even more enjoyable. Now I can post from anywhere, and the world can read it instantly.

Writing blog on live Strapi app
Getting started with a Strapi project locally was easy. Strapi provides clear documentation and helpful blog posts that guide you through the setup step by step. You can check out the official docs here.
However, I encounter my first challenge when designing the content-types and database schema. Coming from a frontend background, this part of the process is still something I’m getting comfortable with.
I quickly realized I needed a Blog content type, which would include a single Author and multiple Categories. To better understand the relationships, I created an ERD diagram, which you can find below.
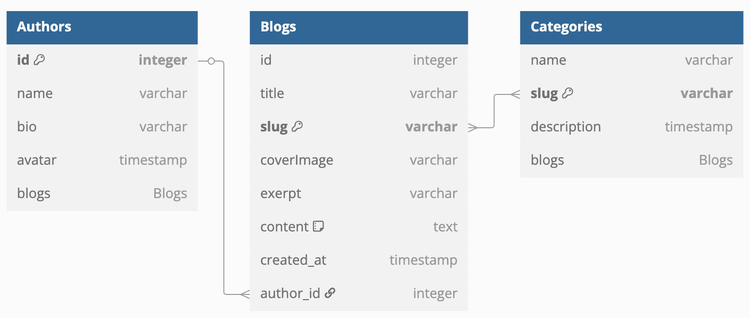
Entity Relationship Diagram of Strapi Blog Posts
After designing the ERD, creating the content types in Strapi became much more straightforward. While writing my first blog post, I decided to take the advantage of Strapi’s Dynamic Zone feature to mix and match different components for my blog content.
I set up three types of blocks: Markdown, Rich Text, and Media. These blocks—integrated through the Dynamic Zone—give me the flexibility to structure each post exactly how I want.
The second challenge was getting my Strapi application into production, so my portfolio site could fetch blog post data anytime—without needing to run Strapi locally. After exploring a few deployment options, I chose Render. Why? Because Render offers a simple, developer-friendly setup with automatic deployments and a generous free tier.
However, Render’s free tier comes with a major drawback: it puts the app to sleep after 15 minutes of inactivity and uses an ephemeral disk. This can cause my portfolio site to fail when fetching the blog posts, and the ephemeral storage means that any locally uploaded content or media could be lost after a redeploy or restart.
To avoid losing data and improve stability, I decided to migrate my Strapi database from local SQLite to a hosted PostgreSQL service. SQLite was great for local development, but not ideal for production—especially on platforms with ephemeral disks like Render.
I went with Neon, a modern, serverless PostgreSQL solution. I chose Neon because it’s one of the recommended options in the Strapi Marketplace, which means they should work well together. It offers persistent storage, a generous free tier, and a smooth setup experience. I followed the steps from this guide.
After handling the database, the next step was moving my uploaded media out of local storage. I decided to migrate all my assets to Cloudinary, a powerful cloud-based media storage solution. Just like Neon, Cloudinary is one of the official integrations listed in the Strapi Marketplace, so setup was smooth and well-supported.
By switching to Cloudinary, I no longer have to worry about losing uploaded images or videos when the server restarts. It also gives me a CDN-powered media pipeline that works great for performance. For a more detailed guide on setting it up, I followed this tutorial.
Strapi v4 introduced the Transfer Token feature, which makes it easy to move data between environments. It’s a huge time-saver during development, letting me build locally and push content to production only when it’s ready.
While using this feature, I ran into an interesting issue. Since both my local and production environments use Cloudinary for media uploads, transferring the media files caused some of them to break. To solve this, I excluded files from the transfer process using the --exclude flag:
yarn strapi transfer --to <prod-url> --exclude files
After running the command above, Strapi will prompt you to enter a Transfer Token, which you can generate from the admin panel under Settings > Transfer Tokens. A token can be set up to allow push, pull, or both directions—meaning you can sync data between two environments easily.
You can read more about Transfer Tokens and how to use them in the official Strapi documentation.
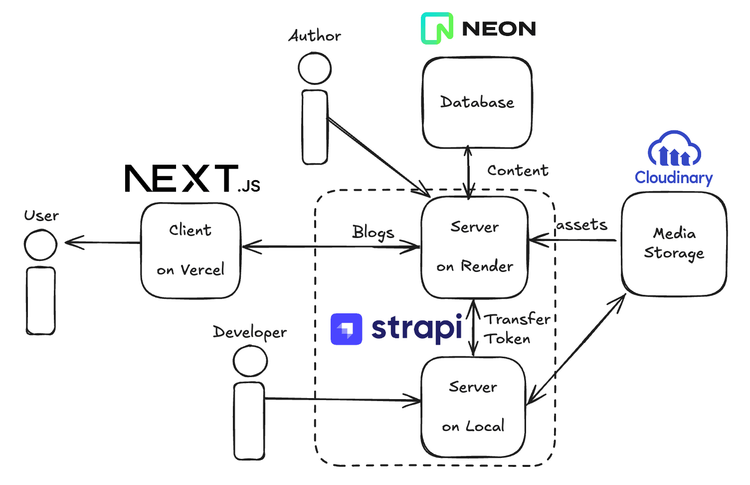
Diagram of blog post system architecture
After deploying Strapi with Render, I started noticing areas for improvement. The biggest one is Render’s limitation with its free tier—especially the automatic sleep after 15 minutes of inactivity, which can cause issues for my portfolio site. Because of that, I’m planning to migrate my Strapi backend to another platform that offers more reliability for production use.
Another improvement I’m considering is moving my Strapi application server and database closer together to reduce latency and improve data transfer speed. To achieve this, I’m looking into using Railway—a platform that provides both app hosting and managed databases with no automatic sleep on free tier (as of today 😅) making the setup more streamlined and efficient.